Automation with Rules
Overview
The BatAction plugin is a "background plugin" which means it runs within the Milestone Event Server service. It's a MIP plugin sample with source code available on GitHub, and it demonstrates how a .NET developer can build a plugin which exposes custom "rule actions". In this case, the custom actions will execute a .BAT file located within the plugin's "BatFiles" folder with optional arguments.
This guide explains one way you could use this existing, and freely available sample plugin, to add powerfull new capabilities to your VMS. We can do this by calling an external PowerShell script from a .BAT file, and within a PowerShell environment we have access to the MilestonePSTools module, and countless built-in, and third-party modules.
Install MilestonePSTools
You may have different plans for the BatAction plugin which do not involve MilestonePSTools. If so, feel free to move on to the next section. Otherwise, you will need to have the module installed on the same computer as your Milestone Event Server service.
Normally this is the same computer as the Management Server service, but in some environments the Event Server is installed on an independent computer.
Wherever your Event Server is installed, be sure to install MilestonePSTools. Check out the installation guide if you haven't done so already.
Install BatAction
The quick install script below can be run in a PowerShell terminal on the Event
Server computer and it will download a copy of the BatAction plugin, place it
in your C:\Program Files\VideoOS\MIPPlugins\ directory, place sample
CameraReport.bat and CameraReport.ps1 files in their respective BatFiles\
and Ps1Files subfolders, and restart your Event Server service.
Set-ExecutionPolicy RemoteSigned -Scope Process -Force; [System.Net.ServicePointManager]::SecurityProtocol = [System.Net.ServicePointManager]::SecurityProtocol -bor 3072; Invoke-Expression (Invoke-RestMethod 'https://www.milestonepstools.com/scripts/install-bataction.ps1')
If you used the quick install script above, you can move on to the next section. Otherwise, read on to see how to install the plugin by hand.
- Download BatAction.
- Make sure to unblock the ZIP file before extracting it.
- Right-click on the ZIP file and select Properties.
- If you see a checkbox to unblock the file, check the box and press OK.
- Extract the files to
C:\Program Files\VideoOS\MIPPlugins. - Check that the plugin.def file is present at
C:\Program Files\VideoOS\MIPPlugins\BatAction\plugin.def. - Restart the Milestone Event Server service
The plugin is now installed and ready to use with a basic Sample.bat file. To
see tips on how to add your own scripts, check out the next section.
Some background on MIP plugins
Milestone plugins are typically loaded from one of two folder locations:
- C:\Program Files\Milestone\MIPPlugins
- C:\Program Files\VideoOS\MIPPlugins
Info
The VideoOS folder is OEM-friendly so that in many cases plugins written for
a Milestone product will also work for products OEM'd from Milestone and
sold/supported by an OEM partner.
There are three Milestone components that will look for plugins to load during startup:
- Management Client
- XProtect Smart Client
- Event Server
Each plugin has it's own subfolder in the MIPPlugins folder(s), and in that
folder there is a plugin.def file which defines the entrypoint for the plugin
and the environment in which the plugin should be loaded. For example, a plugin
for XProtect Smart Client is not normally loaded by the Event Server.
The plugin definition file for BatAction looks like this:
CameraReport.bat and CameraReport.ps1
If you installed the BatAction plugin using the quick install script, you already have the following two files:
- C:\Program Files\VideoOS\MIPPlugins\BatAction\BatFiles\CameraReport.bat
- C:\Program Files\VideoOS\MIPPlugins\BatAction\Ps1Files\CameraReport.ps1
On the surface, it seems like you may be able to get away with just putting PS1
files in the BatFiles folder. The BatAction plugin doesn't care what the file
type is - it will find all files in the folder. However, in practice, it seems
the parameters used with the .NET ProcessStartInfo may not always allow you
to successfully launch PowerShell scripts directly with the BatAction plugin.
For this reason, you'll find the CameraReport.bat consists of the following line. And if you install the plugin manually, feel free to create your own BAT file with the content below.
powershell.exe -ExecutionPolicy Bypass -NoProfile -NonInteractive -NoLogo -File "%~dp0..\Ps1Files\%~n0.ps1" %*
This line will use powershell.exe (Windows PowerShell 5.1 x64) to launch a file
with the same name as the .BAT file, but with a .PS1 extension, and in the
C:\Program Files\VideoOS\MIPPlugins\BatAction\Ps1Files\ folder. All the
arguments passed to the .BAT file will be passed on to the .PS1 file.
The following script is the full contents of the CameraReport.ps1 file which
features a function you can use to parse the BatAction arguments passed on to
the script, and it demonstrates a rudimentary way to add logging to your script
using the Start-Transcript cmdlet.
Note
Restart the Event Server service after making any changes to the BatFiles\ folder
function ConvertFrom-BatActionArgList {
    [CmdletBinding()]
    [OutputType([pscustomobject])]
    param(
        [Parameter()]
        [string[]]
        $ArgumentList
    )

    process {
        $obj = [pscustomobject]@{
            SourceId   = [guid]::Empty
            SourceName = $null
            SourceType = $null
            Devices    = New-Object System.Collections.Generic.List[pscustomobject]
        }

        $index = 0
        if ($ArgumentList.Count -gt 0 -and $null -ne ($ArgumentList[0] -as [guid])) {
            $obj.SourceId = $ArgumentList[0] -as [guid]
            $obj.SourceName = $ArgumentList[1]
            $obj.SourceType = $ArgumentList[2]
            $index = 3
        }

        for (; $index -lt $ArgumentList.Count; $index++) {
            if ($ArgumentList[$index] -match '^Item=(?<id>[0-9a-fA-F\-]{36}) Name=(?<name>.+)$') {
                $obj.Devices.Add([pscustomobject]@{
                    Name = $Matches.name
                    Id   = $Matches.id
                })
            }
            else {
                Write-Error "Format of `$arg[$index] was unexpected. Expected ""Item=<guid> Name=<name>"" but received ""$($ArgumentList[$index])"""
            }
        }

        Write-Output $obj
    }
}

try {
    # Use Start-Transcript to log to C:\ProgramData\Milestone\BatAction\BatAction.log
    # Note: The log file gets re-written on every execution to keep things simple and avoid generating too many logs.
    $workingDir = Join-Path $env:ProgramData 'Milestone\BatAction\'
    $null = New-Item -Path $workingDir -ItemType Directory -Force
    $transactionLogPath = Join-Path $workingDir 'BatAction.log'
    Start-Transcript -Path $transactionLogPath


    <# The $args variable holds all arguments passed to the script. Here, we're calling the function
    above to parse the arguments into something that is easier to use in PowerShell.

    We won't use this object in this example, but you could for instance write a script tha
    uses MilestonePSTools to perform an export of video associated with a bookmark.

    The object returned by ConvertFrom-BatActionArgList looks like...

    [guid]$SourceId (will be [guid]::Empty if the trigger was based on a schedule)
    [string]$SourceName (will be $null if the trigger was based on a schedule)
    [string]$SourceType (will be $null if the trigger was based on a schedule, otherwise usually 'Event' or 'Camera')
    [pscustomobject[]]$Devices (empty array, or a list of pscustomobjects each with a Name and Id property)
    #>
    $BatActionArgs = ConvertFrom-BatActionArgList -ArgumentList $args
    Write-Host "The BatAction plugin provided the following data:`r`n$($BatActionArgs | ConvertTo-Json)`r`n"

    $timestamp = (Get-Date).ToString('yyyy-MM-dd_HH-mm-ss')
    $fileName = "Camera-Report_$timestamp.csv"
    $reportPath = Join-Path -Path $workingDir -ChildPath $fileName

    Write-Host "Connecting to http://localhost as $($env:USERNAME)"
    Connect-ManagementServer -AcceptEula
    Write-Host 'Connected'

    Write-Host "Running Get-VmsCameraReport and saving the results to $reportPath"
    Get-VmsCameraReport -Verbose | Export-Csv -Path $reportPath -NoTypeInformation
    Write-Host 'Done'
}
finally {
    Stop-Transcript
}
Putting BatAction to use
Now that you have the BatAction plugin installed and configured with at least
the CameraReport.* samples above, follow these steps to trigger your script.
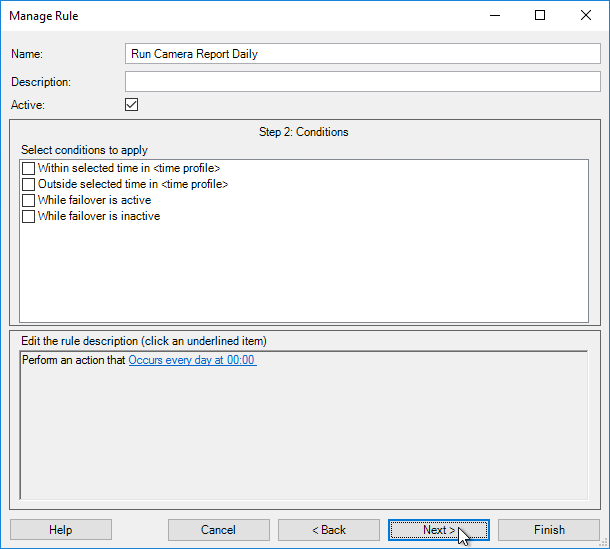
- Step 0: Create a new rule in Milestone XProtect Management Client under Rules and Events and then Rules, and give it a name.
- Step 1: Select the rule type, "Perform an action on a
". - Step 2: Leave all conditions unselected and click Next.
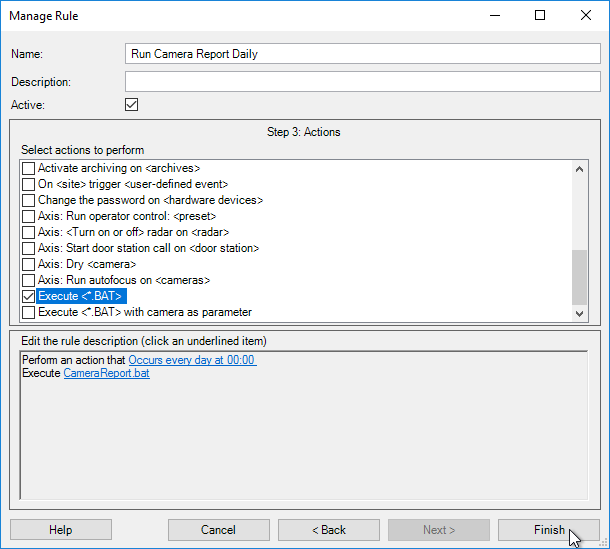
- Step 3: Select either the
Execute <*.BAT>orExecute <*.BAT> with camera as parameteraction and use the hyperlink(s) in the rule description below to fill in the blanks. - Click Finish The former will execute the .BAT file with no arguments, unless the trigger is except the while the latter
Step 1

Step 2
Step 3
Extending this example
Since PowerShell is such an expansive scripting language, there is no end to the kind of tasks you could perform by combining the BatAction plugin with PowerShell. Some ideas we can think of include:
- Automatic, scheduled reports or reports on-demand using User-defined Events.
- Create an export of the video one minute before, and one minute after a live bookmark is created.
- Send an HTTP POST using
Invoke-RestMethodwith a JSON object representing a camera when Milestone reports a connection error with the camera.
Follow these steps to add your own custom scripts to execute using the BatAction plugin:
- Create a copy of
C:\Program Files\VideoOS\MIPPlugins\BatAction\BatFiles\CameraReport.batand name it appropriately, with a .BAT extension. - Create a copy of
C:\Program Files\VideoOS\MIPPlugins\BatAction\Ps1Files\CameraReport.ps1and name it the same as the .BAT file, but with a .PS1 extension. - Edit your renamed copy of
CameraReport.ps1, and either replace everything in the script with your own code, or if you prefer to re-use the parameter parsing function and the logging toC:\ProgramData\Milestone\BatAction, you can replace everything between$BatActionArgs = ConvertFrom-BatActionArgList -ArgumentList $argsandWrite-Host 'Done'. - Restart the Milestone Event Server service to detect the new .BAT file.