Working with snapshots
Introduction
In the context of MilestonePSTools, a snapshot is a JPEG image from a camera live feed, or previously recorded video.
In this guide you'll learn how to work with snapshots through Get-Snapshot,
and Get-VmsCameraReport, how to save snapshots to disk, and how to produce
an Excel spreadsheet with embedded images.
To follow along, download the files discussed in this guide and extract the contents to C:\demo.
Retrieving snapshots
Let's begin with an introduction to the Get-Snapshot cmdlet. This cmdlet
uses the JPEGLiveSource and JPEGVideoSource classes from MIP SDK which can
request video from a recording server in the original video format, and then
convert the feed to JPEG on the client system using hardware acceleration if
available. Because the conversion takes place on the PowerShell side, there's
no extra load on the recording server beyond a normal live or playback request.
Here's what it looks like to request a live image, and a recorded image...
Connect-ManagementServer -ShowDialog -AcceptEula
$camera = Select-Camera -SingleSelect # (1)!
$liveSnapshot = $camera | Get-Snapshot -Live
$liveSnapshot

<# OUTPUT (live)
  BeginTime              : 2/2/2022 10:34:23 PM
  EndTime                : 2/2/2022 10:34:23 PM
  Content                : {255, 216, 255, 224...}
  Properties             : {}
  HardwareDecodingStatus : hardwareNvidia
  Width                  : 1920
  Height                 : 1080
  CroppingDefined        : False
  CropX                  : 0
  CropY                  : 0
  CropWidth              : 1
  CropHeight             : 1
  CustomData             :
#>


$recordedSnapshot = $camera | Get-Snapshot -Timestamp (Get-Date).AddHours(-2)
$recordedSnapshot

<# OUTPUT (recorded)
  HardwareDecodingStatus : hardwareNvidia
  Width                  : 1920
  Height                 : 1080
  CroppingDefined        : False
  CropX                  : 0
  CropY                  : 0
  CropWidth              : 1
  CropHeight             : 1
  CustomData             :
  DateTime               : 2/2/2022 10:14:07 PM
  Bytes                  : {255, 216, 255, 224...}
  IsNextAvailable        : True
  NextDateTime           : 2/2/2022 10:14:07 PM
  IsPreviousAvailable    : True
  PreviousDateTime       : 2/2/2022 10:05:42 PM
#>
Select-Camerais a useful camera selection tool when working with PowerShell interactively. You would not want to use Select-Camera in an automated script as it requires user-interaction.
The response from Get-Snapshot is a VideoOS.Platform.Live.LiveSourceContent object when requesting a live image,
or a VideoOS.Platform.Data.JPEGData
object when requesting a previously recorded image.
These objects provide image dimensions, hardware acceleration status, timestamps, and in the case of a recorded image, you also get information about the previous, and next images available.
Once you have one of these objects, you can access the JPEG as a byte array named Content or Bytes depending on whether the snapshot is from the live feed, or a recorded image from the media database.
Saving images
The [byte[]] value of the Content or Bytes properties can be written
directly to disk or used in memory however you like. Here's how you could save
those byte arrays to disk as .JPG files...
$null = mkdir C:\demo\ -Force
[io.file]::WriteAllBytes('c:\demo\liveSnapshot.jpg', $liveSnapshot.Content)
Invoke-Item 'C:\demo\liveSnapshot.jpg'

[io.file]::WriteAllBytes('c:\demo\recordedSnapshot.jpg', $recordedSnapshot.Bytes)
Invoke-Item 'C:\demo\recordedSnapshot.jpg'
There's an easier way to save these snapshots as files though. All you need to
do is use the -Save switch, with a path to a folder where the snapshots should
be stored...
$null = $camera | Get-Snapshot -Live -Save -Path C:\demo\ -UseFriendlyName # (1)!
Get-ChildItem C:\Demo

<# OUTPUT
  Directory: C:\demo

  Mode    LastWriteTime       Length Name
  ----    -------------       ------ ----
  -a----  2/2/2022   2:57 PM  292599 Cam Lab Camera_2022-02-02_22-57-24.445.jpg
#>
- The
Get-Snapshotcmdlet will still return data to PowerShell even if you save the image to disk, so by assigning the response to$nullwe can suppress the output when we don't need it.
A fixed file name can be specified for each snapshot by providing a value for
the -FileName parameter. Otherwise a file will be created in the folder
specified by -Path with either the camera ID, or the camera name, followed by
a timestamp either in UTC, or in the local time zone when the -LocalTimeStamp
switch is present.
Note
When saving a snapshot using the -UseFriendlyName switch, the camera name
will be used in the file name. If there are any characters in the camera
name that are invalid for Windows file names, they'll be replaced with a
dash (-) character.
Create Excel Documents
The ImportExcel PowerShell module makes it easy to read and write data in Excel documents, even without Excel installed on the same computer. And with a little extra work, we can embed images into those documents.
Installing ImportExcel is similar to installing any other PowerShell module
hosted on PowerShell Gallery: Install-Module -Name ImportExcel.
In this part of the guide, we'll introduce a helper function for adding images
to an Excel document created using ImportExcel, and then we'll show how to use
it to embed snapshots from Get-VmsCameraReport as well as generate a report
on closed alarms with images.
Tip
To follow along, click the "Download" button at the top of the guide and extract to a folder at C:\demo.
Function: Add-ExcelImage
There are no built-in cmdlets in ImportExcel (yet) for adding images to an Excel document. The following function demonstrates how this can be done using methods from the underlying EPPlus library and you're welcome to reuse this by adding it to the top of your script or you can save in it's own file and dot-source it from your script as we'll show later on.
function Add-ExcelImage {
    <#
    .SYNOPSIS
        Adds an image to a worksheet in an Excel package.
    .DESCRIPTION
        Adds an image to a worksheet in an Excel package using the
        `WorkSheet.Drawings.AddPicture(name, image)` method, and places the
        image at the location specified by the Row and Column parameters.

        Additional position adjustment can be made by providing RowOffset and
        ColumnOffset values in pixels.
    .EXAMPLE
        $image = [System.Drawing.Image]::FromFile($octocat)
        $xlpkg = $data | Export-Excel -Path $path -PassThru
        $xlpkg.Sheet1 | Add-ExcelImage -Image $image -Row 4 -Column 6 -ResizeCell

        Where $octocat is a path to an image file, and $data is a collection of
        data to be exported, and $path is the output path for the Excel document,
        Add-Excel places the image at row 4 and column 6, resizing the column
        and row as needed to fit the image.
    .INPUTS
        [OfficeOpenXml.ExcelWorksheet]
    .OUTPUTS
        None
    #>
    [CmdletBinding()]
    param(
        # Specifies the worksheet to add the image to.
        [Parameter(Mandatory, ValueFromPipeline)]
        [OfficeOpenXml.ExcelWorksheet]
        $WorkSheet,

        # Specifies the Image to be added to the worksheet.
        [Parameter(Mandatory)]
        [System.Drawing.Image]
        $Image,

        # Specifies the row where the image will be placed. Rows are counted from 1.
        [Parameter(Mandatory)]
        [ValidateRange(1, [int]::MaxValue)]
        [int]
        $Row,

        # Specifies the column where the image will be placed. Columns are counted from 1.
        [Parameter(Mandatory)]
        [ValidateRange(1, [int]::MaxValue)]
        [int]
        $Column,

        # Specifies the name to associate with the image. Names must be unique per sheet.
        # Omit the name and a GUID will be used instead.
        [Parameter()]
        [string]
        $Name,

        # Specifies the number of pixels to offset the image on the Y-axis. A
        # positive number moves the image down by the specified number of pixels
        # from the top border of the cell.
        [Parameter()]
        [int]
        $RowOffset = 1,

        # Specifies the number of pixels to offset the image on the X-axis. A
        # positive number moves the image to the right by the specified number
        # of pixels from the left border of the cell.
        [Parameter()]
        [int]
        $ColumnOffset = 1,

        # Increase the column width and row height to fit the image if the current
        # dimensions are smaller than the image provided.
        [Parameter()]
        [switch]
        $ResizeCell
    )

    begin {
        if ($IsWindows -eq $false) {
            throw "This only works on Windows and won't run on $([environment]::OSVersion)"
        }

        <#
          These ratios work on my machine but it feels fragile. Need to better
          understand how row and column sizing works in Excel and what the
          width and height units represent.
        #>
        $widthFactor = 1 / 7
        $heightFactor = 3 / 4
    }

    process {
        if ([string]::IsNullOrWhiteSpace($Name)) {
            $Name = (New-Guid).ToString()
        }
        if ($null -ne $WorkSheet.Drawings[$Name]) {
            Write-Error "A picture with the name `"$Name`" already exists in worksheet $($WorkSheet.Name)."
            return
        }

        <#
          The row and column offsets of 1 ensures that the image lands just
          inside the gray cell borders at the top left.
        #>
        $picture = $WorkSheet.Drawings.AddPicture($Name, $Image)
        $picture.SetPosition($Row - 1, $RowOffset, $Column - 1, $ColumnOffset)

        if ($ResizeCell) {
            <#
              Adding 1 to the image height and width ensures that when the
              row and column are resized, the bottom right of the image lands
              just inside the gray cell borders at the bottom right.
            #>
            $width = $widthFactor * ($Image.Width + 1)
            $height = $heightFactor * ($Image.Height + 1)
            $WorkSheet.Column($Column).Width = [Math]::Max($width, $WorkSheet.Column($Column).Width)
            $WorkSheet.Row($Row).Height = [Math]::Max($height, $WorkSheet.Row($Row).Height)
        }
    }
}
Function: Export-ExcelCustom
The following function will be used to export collections of data, including
System.Drawing.Image objects. It offers a flexible way to produce
a styled Excel table from a data set, with support for images. Soon we'll
demonstrate how to use this with the built-in Get-VmsCameraReport cmdlet.
Warning
This function does not support streaming data from the pipeline. That means all rows of data must be in memory all at once, images included. If your report has many thousands of rows, it's possible that this function will not work for you.
function Export-ExcelCustom {
    <#
    .SYNOPSIS
        Exports a collection of data to an Excel document with support for images.
    .DESCRIPTION
        This cmdlet produces a styled Excel spreadsheet where the data may
        contain System.Drawing.Image objects.

        If any images are present, the rows will all be resized to a uniform
        height matching the tallest image available.

        Each column will be resized to match the widest image in that column.
    .EXAMPLE
        Export-ExcelCustom -Path .\report.xlsx -InputObject (Get-VmsCameraReport -IncludeSnapshots) -Show

        Exports the results of Get-VmsCameraReport with images to an Excel document.
    .INPUTS
        [object]
    #>
    [CmdletBinding()]
    param(
        # Specifies a collection of data to export to Excel.
        [Parameter(Mandatory)]
        [object[]]
        $InputObject,

        # Specifies the path to save the Excel document including the file name.
        [Parameter(Mandatory)]
        [string]
        $Path,

        # Specifies an optional title.
        [Parameter()]
        [string]
        $Title,

        # Specifies a [TableStyles] value. Default is 'Medium9' and valid
        # options can be found by checking the TableStyle parameter help info
        # from the Export-Excel cmdlet.
        [Parameter()]
        [string]
        $TableStyle = 'Medium9',

        # Specifies that the resulting Excel document should be displayed, if
        # possible, after the file has been saved.
        [Parameter()]
        [switch]
        $Show
    )

    process {
        $exportParams = @{
            Path       = $Path
            PassThru   = $true
            TableName  = 'CustomReport'
            TableStyle = $TableStyle
            AutoSize   = $true
        }
        if (-not [string]::IsNullOrWhiteSpace($Title)) {
            $exportParams.Title = $Title
        }

        # Find out if any of the rows contain an image, and find the maximum
        # height so we can make the row heights uniform.
        $imageHeight = -1
        $hasImages = $false
        $keys = $InputObject[0].psobject.properties | Select-Object -ExpandProperty Name
        foreach ($obj in $InputObject) {
            foreach ($key in $keys) {
                if ($obj.$key -is [System.Drawing.Image]) {
                    $imageHeight = [math]::Max($imageHeight, $obj.$key.Height)
                    $hasImages = $true
                }
            }
        }

        try {
            $pkg = $InputObject | Export-Excel @exportParams
            if ($hasImages) {
                # The rest of this function is only necessary if there are any images.
                $rowOffset = 2
                if ($exportParams.ContainsKey('Title')) { $rowOffset++ }
                for ($i = 0; $i -lt $InputObject.Count; $i++) {
                    $row = $i + $rowOffset
                    if ($imageHeight -gt 0) {
                        $pkg.Sheet1.Row($row).Height = (3 / 4) * ($imageHeight + 1)
                    }

                    $col = 1
                    foreach ($key in $keys) {
                        # Each column of each row is checked to see if the value
                        # is of type "Image". If so, remove the text from the cell
                        # and add the image using Add-ExcelImage.
                        if ($InputObject[$i].$key -is [System.Drawing.Image]) {
                            $pkg.Sheet1.SetValue($row, $col, '')
                            $imageParams = @{
                                WorkSheet  = $pkg.Sheet1
                                Image      = $InputObject[$i].$key
                                Row        = $row
                                Column     = $col
                                ResizeCell = $true
                            }
                            Add-ExcelImage @imageParams
                        }
                        $col++
                    }
                }
            }
        } finally {
            $pkg | Close-ExcelPackage -Show:$Show
        }
    }
}
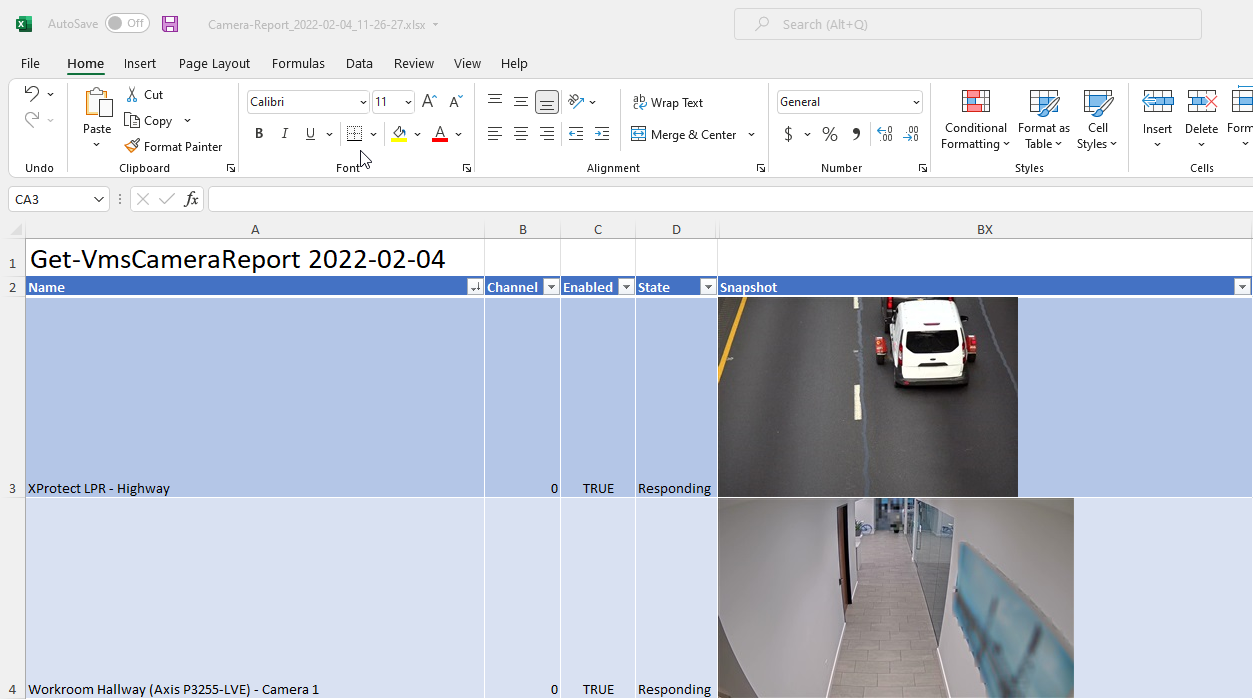
Example 1 - Get-VmsCameraReport
With these two functions available in our scripts folder at C:\demo, or wherever you decide to run them from, we'll use the following script which dot-sources the functions we need, connects to the Management Server, and exports a camera report with snapshots to an Excel spreadsheet. Run this script from PowerShell, and if you have Excel installed, the report will be opened upon completion.
#Requires -Module MilestonePSTools, ImportExcel

. .\Add-ExcelImage.ps1
. .\Export-ExcelCustom.ps1

Connect-ManagementServer -ShowDialog -AcceptEula
$report = Get-VmsCameraReport -IncludeSnapshots -SnapshotHeight 200 -Verbose
$path = '.\Camera-Report_{0}.xlsx' -f (Get-Date -Format yyyy-MM-dd_HH-mm-ss)
Export-ExcelCustom -InputObject $report -Path $path -Title "Get-VmsCameraReport" -Show
Example 2 - Get-VmsAlarmReport
The Get-VmsAlarmReport function below was originally designed as a simple
CSV report to list recently closed alarms with the operator, reason codes, and
notes. The function is built using MilestonePSTools, but is not built-in
because it's a very opinionated idea of how you might want to pull information
out of Milestone. Rather than maintain it as part of MilestonePSTools, it is
offered as an example for you to use as-is or modify to suit your needs.
function Get-VmsAlarmReport {
    <#
    .SYNOPSIS
        Gets a list of alarms matching the specified criteria.
    .DESCRIPTION
        Uses Get-AlarmLine with conditions specified using New-AlarmCondition
        to retrieve a list of alarms within the specified time frame and
        matching optional State and Priority criteria.

        The AlarmUpdateHistory is queried for each alarm to retrieve the
        reason for closing and closing comments, if available.

        Optionally, snapshots can be requested for each alarm. If requested,
        these snapshots will be from only one "related camera". Alarms may have
        multiple related cameras, but the AlarmClient will only
    .EXAMPLE
        Connect-ManagementServer -ShowDialog -AcceptEula
        Get-VmsAlarmReport -StartTime (Get-Date).AddDays(-1) -State Closed -UseLastModified

        Gets a report of all alarms last modified in the last 24 hour period, with
        a current state of "Closed".
    #>
    [CmdletBinding()]
    param(
        # Specifies the start time to filter for alarms created on or after
        # StartTime, or last modified on or after StartTime when used with the
        # UseLastModified switch.
        [Parameter()]
        [datetime]
        $StartTime = (Get-Date).AddHours(-1),

        # Specifies the end time to filter for alarms created on or before
        # EndTime, or last modified on or before EndTime when used with the
        # UseLastModified switch.
        [Parameter()]
        [datetime]
        $EndTime = (Get-Date),

        # Specifies an optional state name with which to filter alarms. Common
        # states are New, In progress, On hold, and Closed. Custom alarm states
        # may be defined for your environment in Management Client.
        [Parameter()]
        [string]
        $State,

        # Specifies an optional priority name with which to filter alarms.
        # Common priorities are High, Medium, and Low. Custom priorities may
        # be defined for your environment in Management Client.
        [Parameter()]
        [string]
        $Priority,

        # Specifies that the StartTime and EndTime filters apply to the
        # "Modified" property of the alarm instead of the "Timestamp" property.
        [Parameter()]
        [switch]
        $UseLastModified,

        # Specifies that the timestamps returned with the report should be
        # converted from UTC time to the local time based on the region settings
        # of the current PowerShell session.
        [Parameter()]
        [switch]
        $UseLocalTime,

        # Specifies that a snapshot should be retrieved for each alarm having
        # a related camera. The snapshot will be returned as a System.Drawing.Image
        # object.
        [Parameter()]
        [switch]
        $IncludeSnapshots,

        # Specifies the desired snapshot height in pixels. The snapshots will
        # be resized accordingly.
        [Parameter()]
        [ValidateRange(50, [int]::MaxValue)]
        [int]
        $SnapshotHeight = 200
    )

    begin {
        $mgr = [VideoOS.Platform.Proxy.AlarmClient.AlarmClientManager]::new()
        $alarmClient = $mgr.GetAlarmClient((Get-VmsSite).FQID.ServerId)
    }

    process {
        $target = if ($UseLastModified) { 'Modified' } else { 'Timestamp' }
        $conditions = [System.Collections.Generic.List[VideoOS.Platform.Proxy.Alarm.Condition]]::new()
        $conditions.Add((New-AlarmCondition -Target $target -Operator GreaterThan -Value $StartTime.ToUniversalTime()))
        $conditions.Add((New-AlarmCondition -Target $target -Operator LessThan -Value $EndTime.ToUniversalTime()))

        if ($MyInvocation.BoundParameters.ContainsKey('State')) {
            $conditions.Add((New-AlarmCondition -Target StateName -Operator Equals -Value $State))
        }
        if ($MyInvocation.BoundParameters.ContainsKey('Priority')) {
            $conditions.Add((New-AlarmCondition -Target PriorityName -Operator Equals -Value $Priority))
        }

        $sortOrders = New-AlarmOrder -Order Ascending -Target $target

        Get-AlarmLine -Conditions $conditions -SortOrders $sortOrders | ForEach-Object {
            $alarm = $_
            $history = $alarmClient.GetAlarmUpdateHistory($alarm.Id) | Sort-Object Time
            $openedAt = if ($UseLocalTime) { $alarm.Timestamp.ToLocalTime() } else { $alarm.Timestamp }

            $closingUpdate = $history | Where-Object Key -eq 'ReasonCode' | Select-Object -Last 1
            $closingReason = $closingUpdate.Value
            $closingUser = $closingUpdate.Author
            $closedAt = if ($UseLocalTime -and $null -ne $closingUpdate.Time) { $closingUpdate.Time.ToLocalTime() } else { $closingUpdate.Time }
            $closingComment = ($history | Where-Object { $_.Key -eq 'Comment' -and $_.Time -eq $closingUpdate.Time }).Value

            $operator = if ([string]::IsNullOrWhiteSpace($closingUser)) { $alarm.AssignedTo } else { $closingUser }

            $obj = [ordered]@{
                CreatedAt = $openedAt
                Alarm = $alarm.Name
                Message = $alarm.Message
                Source = $alarm.SourceName
                ClosedAt = $closedAt
                ReasonCode = $closingReason
                Notes = $closingComment
                Operator = $operator
            }
            if ($IncludeSnapshots) {
                $obj.Snapshot = $null
                if ($alarm.CameraId -eq [guid]::empty) {
                    $obj.Snapshot = 'No camera associated with alarm'
                } else {
                    $cameraItem = [VideoOS.Platform.Configuration]::Instance.GetItem($alarm.CameraId, ([VideoOS.Platform.Kind]::Camera))
                    if ($null -ne $cameraItem) {
                        $snapshot = $null
                        $snapshot = Get-Snapshot -CameraId $alarm.CameraId -Timestamp $openedAt -Behavior GetNearest -Quality 100
                        if ($null -ne $snapshot) {
                            $obj.Snapshot = ConvertFrom-Snapshot -Content $snapshot.Bytes | Resize-Image -Height $SnapshotHeight -Quality 100 -OutputFormat PNG -DisposeSource
                        } else {
                            $obj.Snapshot = 'Image not available'
                        }
                    } else {
                        $obj.Snapshot = 'Camera not found'
                    }
                }
            }
            Write-Output ([pscustomobject]$obj)
        }
    }

    end {
        $alarmClient.CloseClient()
    }
}
Using the Get-VmsAlarmReport function defined above, this example will
produce a report of all closed alarms that were modified in the last 24 hours.
A snapshot is retrieved for each alarm with a related camera, and the results
are sent to an Excel document.
#Requires -Module MilestonePSTools, ImportExcel

. .\Add-ExcelImage.ps1
. .\Export-ExcelCustom.ps1
. .\Get-VmsAlarmReport.ps1

Connect-ManagementServer -ShowDialog -AcceptEula

$reportParameters = @{
    State = 'Closed'
    Priority = 'High'
    StartTime = (Get-Date).AddDays(-1)
    EndTime = Get-Date

    # Convert the UTC timestamps to local time
    UseLocalTime = $true

    # Get all alarms where last modified time was between StartTime and "Now"
    # instead of where the alarm was CREATED between StartTime and "Now"
    UseLastModified = $true

    IncludeSnapshots = $true
}

$report = Get-VmsAlarmReport @reportParameters
if ($report.Count -gt 0) {
    $path = '.\Alarm-Report_{0}.xlsx' -f (Get-Date -Format yyyy-MM-dd_HH-mm-ss)
    Export-ExcelCustom -InputObject $report -Path $path -Title 'Get-VmsAlarmReport' -Show
} else {
    Write-Warning ("No alarms found between {0} and {1}" -f $reportParameters.StartTime, $reportParameters.EndTime)
}
Conclusion
The ImportExcel module is an extremely powerful tool for working with Excel in PowerShell, and this guide only touches the surface. If you need to do more advanced work importing or exporting Excel data, check out the ImportExcel GitHub repository where the owner, Doug Finke, has provided great documentation and Examples.